
Faye working her magic as she crawls across the canvas.
Who doesn’t love baby art? Me. That’s who.
Don’t get me wrong, I absolutely adore a child’s efforts and thoroughly feel loved when a kid creates something for me, but so often I feel that we either give them materials that are too cheap or too temporary (or worse, a sad combo of both) to warrant a place of honor in our houses.
This is especially true when it comes to arts & crafts for babies and toddlers who are still putting items into their mouths. Edible paint is usually either too thick to manipulate on paper properly, or if watered down to a more manageable consistency, too transparent. Colors tend to be a bland muddied pastel. Worse still, they mold after a week or two. Edible all-natural crayons leave light colored, barely noticeable marks, even when wielded by an adult.

I find it difficult to watch as my daughter struggles to compose a gift for a loved one using these hideous supplies. Therefore, I did what any artist and mom would do, I concocted ways for her to enjoyably compose colorful, malleable, striking, and permanent art work using traditional art materials.
For Father’s Day last year I decided it would be great if Faye could make a permanent painting that captured her current physical abilities. That narrowed it down to pressing, crawling, and dragging. An idea quickly emerged. Off to the art store we went to gather student grade acrylic paints, a large pre-stretched, pre-gessoed museum canvas, and a very large Filbert brush. We also stopped at a home improvement store for a large roll of clear plastic tarp and blue painter’s tape. Less than an hour work later we had a beautiful painting and a memory that would stick with us (or maybe just me) for a lifetime.

I’m not going to lie – it was an expensive endeavor for a baby’s art project, but the investment was completely worthwhile. The stunningly colorful 3′ x 4′ painting has a place of honor on our kitchen wall. Whenever someone inquires as to the artist, they are floored to learn it was Faye at only 9.5 months old. The best part though, is that every other week or so Faye will point to the painting and tell us with a huge smile that it is her painting, that she made it.

The final result drying outside.
SUPPLIES
- student grade acrylic paints (I used and really like Amsterdam Standard Acrylics. Limiting your palette is a great way to save money. I went nuts and bought a ton of 120ml tubes knowing I would use any leftovers for a future project. The colors I used are listed below.)
- #105 Titanium White
- #289 Titanium Buff Light
- #718 Warm Grey
- #267 Azo Yellow Lemon
- #270 Azo Yellow Deep
- #276 Azo Orange
- #311 Vermilion
- #315 Pyrrole Red
- #396 Naphthol Red Medium
- #398 Naphthol Red Light
- #617 Yellowish Green
- #551 Sky Blue Light
- #557 Greenish Blue
- #564 Brilliant Blue
- #661 Turquoise Green
- #735 Oxide Black
- #16 Filbert brush
- 3′ x 4′ canvas (I went with a pre-stretched, pre-gessoed, museum quality canvas to save time and ultimately money since museum quality canvases are so deep they do not need to be framed. This is by far the most expensive item. I think you could replace this with a similarly sized elephant board and save $80. You will need to gesso the elephant board to prep it for painting.)
- roll of clear tarp cut into two very large pieces (approximately 8′ x 8′ each)
- blue painter’s tape
- baby with trimmed fingernails
- play pen or person to secure baby for a few minutes at a time
- a few books or other heavy, flat objects with a straight side
DIRECTIONS
- Clear out a large section on the floor indoors or out. As long as it is a flat surface, it will work. Open up one of the tarps and cover the area with it. Use the painter’s tape to secure the tarp to the floor.
- Place the canvas proper side up.
- OPTIONAL STEP: Paint the background varying shades of white. Let dry before moving on to Step 4.
- If your child is not yet walking, put her in the play pen while you complete step 5. If your baby is walking, let them help you complete step 5.
- Pick out colors and randomly squirt, plop, and fling about the canvas. Don’t cover every bit of white space up.
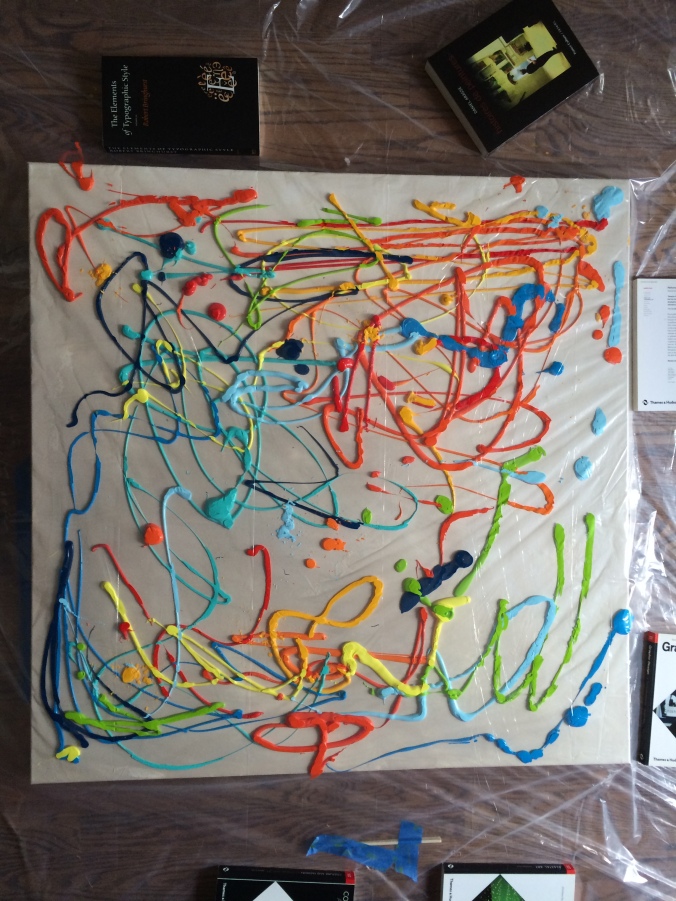
- Gingerly place the second tarp on top of the paint filled canvas. Secure with painter’s tape and books (if necessary).
- Let your child explore the paint using their hands, feet, and any object that will not rip the tarp. (I gave Faye some plastic balls to roll around on the surface.)


- When the child is finished, place them back in the play pen.
- Remove the tarp. How you do so will determine how your painting looks.

- If you lift the tarp up and over, the paint will pull up. This was my experience and I did not like it. I felt it removed a lot of the motion of the piece.
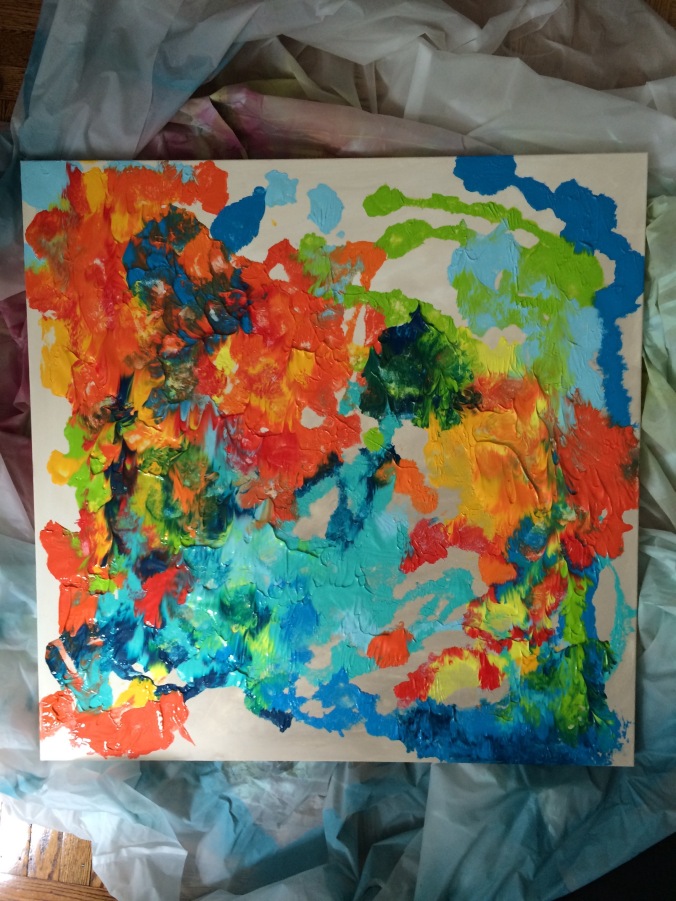
- So I put the tarp back on and dragged it up and across the painting. I liked this result much better.

- Let dry. This may take up to a day or two depending on the humidity in the air and how thick your paint is.
- Add a handprint, name, and date to the back of the canvas.
- Hang in a place of honor.

Love this, have to try it out! Thanks for sharing!!
LikeLike
I’m nervous that my son will be too heavy and punch a hole through the canvas by crawling on it. Was this a concern for you?
LikeLike
Also, what did you use the paintbrush for?
LikeLike
Ah, yes, the paintbrush. I used it to paint the background various shades of white. The baby can use it as a manipulation tool on top of the plastic. Faye made very good use of her brush a few months later that year at Christmas time to make two additional paintings as gifts. This time she did it sans the top piece of plastic and only used brushes and tools-no hands-since she used acrylics.
LikeLike
Not with my daughter who was average weight for her age. I will also have my son make one in a few months and he is super heavy; 22lbs at 4 months.
Canvas is pretty tough, especially when stretched. The most I can see happening is the canvas possibly stretching under his weight if he is super heavy and hangs out in one spot for a long time.
If you are really worried, you can always get an elephant board (aka elephant painting panel). It’s a wooden board with a frame that has zero give.
Please post an image if you make it!
LikeLike
Hi, so you painted the background of the canvas with different shades of white first? Did you let it dry before moving forward with the steps you listed above? What shades of white did you use? Any specific painting technique?
LikeLike
That’s exactly what I did for the background: I painted different shades of white first and let it dry before moving on to the next step. No big technique, I just blended the various shades together using an “X” type of strike for most of it. As far as specific colors, I think I used the first three listed above: 105 #105 Titanium White
#289 Titanium Buff Light
#718 Warm Grey
LikeLike
Pingback: 30+ Painting with Babies Ideas - Active Littles